Thursday, July 29, 2010

Altered Tin

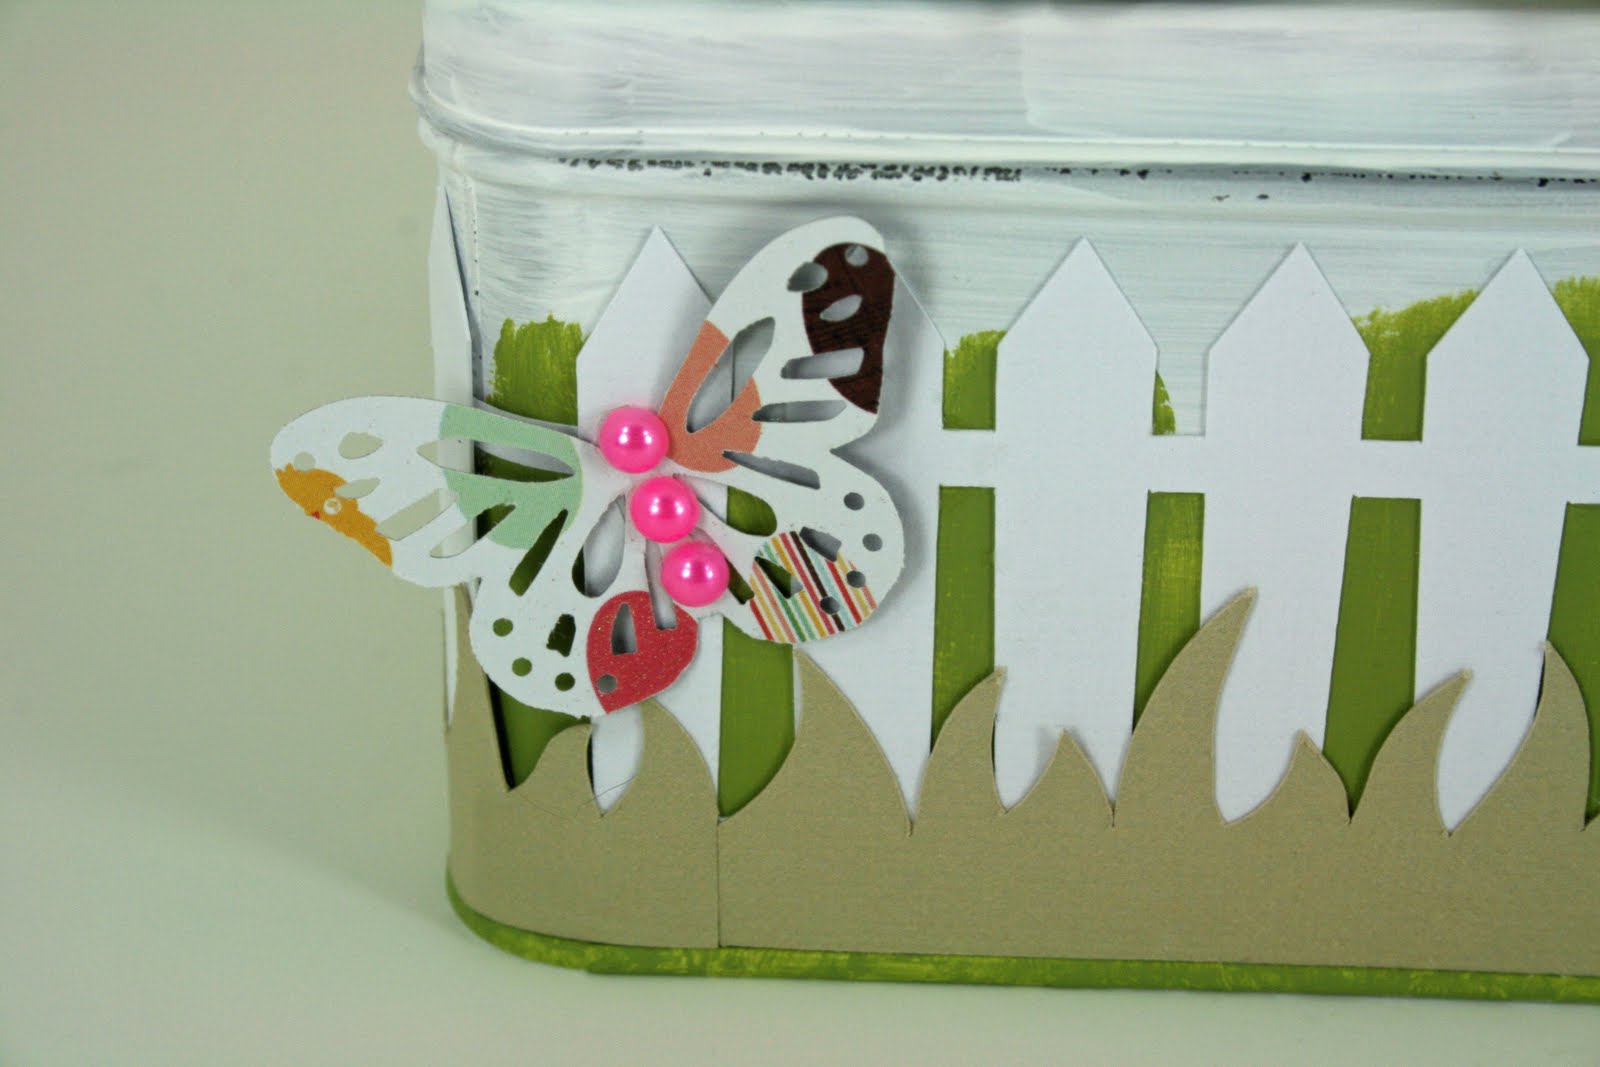
I had a few tin boxes from my local craft store and they were just too plain jane for me. So I decided to turn one into this...
This took a little bit of time to make. First I painted on two coats of gesso. I made the flowers next, three large and six small. Once I got going on those they went pretty fast. Then I used my handy silhouette to cut out all the leaves from two solid sheets of cardstock and one sheet of patterned paper. I painted on some green to the bottom portion, used my silhouette again for the picket fence (love that!) and the grass. Used my favorite butterfly punch for some detail. Then it was just adhering everything down...which I did with glossy accents (holding everything in place very nicely!)!! I am going to use this to hid the candy in my studio...love having m&m's and reeses' pieces near by!


Thanks for stopping by!!
Deb

Wednesday, July 28, 2010

Christmas in July

I have a Christmas card today...I know it's very early for a Christmas card. I made this little gem for the AC Design Team Application. Notice a trend this week?? Yep, I'll be back tomorrow with my other project. You're going to love that one!! Maybe I'll through in a sneak peak of that after the card. But for now, my Christmas card...


I love using pink and green for a Christmas card. So untraditional, but looks really nice and cheery! Everything on this card is AC except for the ink.

And now for the sneak of tomorrow's project...

Thanks for stopping by!!
Deb

Tuesday, July 27, 2010

True Love

This is the second layout I submitted with my application for the American Crafts Design Team. I love the simplicty of this layout! This has to be my favorite picture of my dear hubby and I as I have used it on a few different projects in the past few weeks!


Thanks for stopping by!!
Deb

Monday, July 26, 2010

Locks of Love

This was the layout that I sneaked a few days ago. I sent this in as part of my American Crafts Design Team application. I finally scrapped the pics of my getting my hair cut off (chopped off would be a better way to describe it) to donate to locks of love.

I tucked the journaling behind the post cards I received for my hair donation.

The jounraling reads:
I have never been attached to the length of my hair. I have grown it out many times, just to cut it off really short. I love the shock value doing something this crazy has. Most people would not do something this drastic. If you know me, you know I am not most people. I had been growing my hair out for quite a while, then I watched Anne Curry cut her hair off on the Today show and donate it to Locks of Love, which must have been  a few years before I cut mine, but watching her do that gave me the idea to do it myself. I figured that this time, I would at least be cutting of my hair for a good purpose, not just to end up in the trash. So I started to research how many inches I needed so I would have an end point. You need to have 10 inches of un-processed hair (natural, free from dies, perms, etc). I qualified since I cut off and had re-grown out my natural hair from my last dye job. I think at that point I was somewhere near 8 and a half inches. I talked to my hair dresser who suggested I get a quarter inch trimmed every 6 to 8 weeks to keep the hair strong, so that is what I did. By the time July 31, 2007 rolled around I knew my hair was long enough. I woke up that morning not knowing if it was the day or not. My parents both asked me, but I had not made the decision yet. That ws very un-like me. Usually I knew when I was going in to the hair dresser what I wanted, but not this day. I told my mom to bring the camera just in case. I did not actually decide until Aggie, my hair dresser, asked me what we were going to do with my hair today. At that moment, I knew it was time, and I replied "we are going to cut it off and done it to Locks of Love." Of course she asked if I was sure, which I was. So, since she had already washe dmy ahir, she dried it, then braided it. She asked me one more time if I was really sure, which I absolutly was, and she proceeded to cut the hair off. I ended up donating over 14 inches. For most women, going to such a drastically short length would have been hard, but for me I loved it! And knowing that my hair was going to go to help someone made it feel even better! I am currently in the process of growing my hair out again, to donate again, though I do not think I will go this short nedt time, but with me you never know. I am a woman, and I reserve the right to change my mind!!

Here's a good shot of the before. Also, I love the Martha Stewart butterfly punch layered over the Dear Lizzy fabric paper! So cute!!

And this is a good shot of the after. It was REALLY short!

Thanks for stopping by!!
Deb

Sunday, July 25, 2010

Papertrey Ink Blog Hop

It's that time of the month again...time for another Papertrey Ink Blog Hop. I loved the challenge this month - using office supplies!! In early June, I went to a workshop at my LSS given by the fabulous Margie Romney-Aslett. In that class, she showed us how to take an ordinary file folder and turn it into a mini album. I have been addicted to doing this ever since! This is the third of these little albums I have made, including the one I made at the workshop.


This is a good shot of the hybrid part...the patterned paper I used for the Balloons is from the July Color Couture Download. How have I not used these downloads before?? Love the patterns and for $5 I have an endless supply as long as I have some good white cardstock on hand!!!

Love the Crepe Paper!! I didn't have the right color, so I just took some white and sprayed it with my glimmer mist...pretty good match if you ask me!


Yep, this is one file folder...folded a few times. This one is still a work in progress. I basically have only finished the front cover and the bones of it. It's still waiting to be filled with photos, notes, embellies, and other fun stuff. This is what the bare bones of the inside looks like. I used pattern paper on the bottom fold portion, then just solid cardstock on the upper portion. Also, I should note that I only used enough of the cardstock to go behind where the bottom portion is folded up. This way you're not using paper that no one will see anyway. You can see where my pattern paper wasn't quite the right size, but I didn't want to use another sheet...so I just cut a scrap piece, added some stamping, and I've got the perfect little embellishment on that last page. Oh, and this is also my first Hybrid project (Color Couture Download).

This is what the back of the book looks like. It's not going to have too much more added (no one will really look back there), but I may add a few more flat items. Again, the ticket strip was added because my patterned paper was a little short. Just needed to be a little creative a few time...nothing new for us paper crafters is it??
Here's a better shot of the ticket strip! Love that I could use Just the Ticket and It's Official on this strip!! I left the lines blank figured I can add a date when I actually put things in the little mini album.


And finally back of the mini book with the spiral note die, library card die, and stamps from It's Official. Added my name as well.

Thanks for stopping by and enjoy the Blog Hop tonight! If you're headed to CHA, have a safe journey!!
Deb

Supplies: (all Papertrey Ink unless noted)
Office Supply: File Folder
Cardstock: Vintage Cream, Aqua Mist, Hawaiian Shores
Pattern Paper: Library Ledger, Color Couture July Volume 6 Download
Stamps: It's Official, Just the Ticket, Up Up & Away, Mini Scrapbook Series: Tabs, Take Note, Fillable Frames #5
Ink: Hawaiian Shores, Chocolate Chip (Stampin Up!)
Dies: Up Up & Away, Cloud Collection, Large Scallop Border, Library Pocket, Spiral Notebook Page, Just the Ticket Border, Scalloped Circle (Nestabilities)
Other: 1 3/4 ince Circle Punch (Stampin Up!); Electric Blue and Patina Glimmer Mist (Tattered Angles); Crepe Paper

Saturday, July 24, 2010

American Crafts Card

I really wanted to make a simple card with minimal supplies and I knew I wanted to use some Dear Lizzy products that I adore, so...I came up with this:


I die cut the fabric paper with a butterfly die from Papertrey Ink, then I used my Martha Stewart butterfly punch with some of the Friendly Fern Dear Lizzy patterned paper. I attached them together with my tiny attacher (one of my favorite tools)!! I then took the swirl from the Warble Dear Lizzy stamp set and put it on my acrylic block in a curve instead of using it as a straight swirl and stamped it with some Punch Hero Hue's Chalk ink. The sentiment is from the same stamp set stamped in Grass Hero Hue's Chalk ink. All on some basic white AC cardstock. Love the simplicity of this!!

I'm going to be posting my American Crafts Design Team submissions next week so keep an eye out. Right now I am finishing up my project for the Papertrey Ink Blog Hop tomorrow evening.

Enjoy the rest of your Saturday!!

Thanks for stopping by!
Deb

Sneak Peak

I have spent the last few days working on some projects with lots of American Crafts products and I wanted to sneak peak one of the layouts I did. I will post everything soon, but for now this sneak will have to do.


Oh and by the way, I am loving the American Crafts adhesive found here. I was looking for a new permanent adhesive so I gave this a try...

I picked up the three pack, and I like them all, but I LOVE the dot runner. Going to have to get refills very SOON for this!! Here's more info from American Crafts on all of their adhesives that were released at Winter CHA 2010.

Thanks for stopping by and have a great Saturday!!
Deb